Saturday, October 30, 2010

Retouching 'The Motherland Calls' with adding Typography..

Hi there, the picture above is the statue of "The Motherland Calls". It is located in Mamayev Kurgan in Volgograd, Russia. Fore more info on this statue, click here. It is much bigger and taller than the Statue of Liberty in New York, USA and I was thinking of adding dramatic feeling to the picture with typographies in it. Here's how I did it.

First, I opened the picture (The Motherland Calls statue) that I downloaded from the internet, then I moved my pointer to the 'Open' and click it, there I select the Adobe Photoshop CS5.

Secondly, on the layers section, I renamed the 'Background' to 'Motherland' by double-click on it. After doing this, the picture that I opened in the photoshop is automatically rasterized.

Thirdly, I dragged the 'Motherland' layer to 'Create new layer' to duplicate the layer. As a result, 'Motherland copy' is generated.

Next, I created a new layer, renamed it from 'Layer 1' to 'Clouds'. I also set the layer to 'Overlay' from Normal so that I can see the Motherland statue.

After that, I clicked on "Motherland copy" layer and select Image>Auto Colour. For some reason, this brightens the statue a bit and makes the sky cloudier.

 I then used the 'Dodge Tool' to darken and lighten the image. I darken the picture by using the shortkey  [ALT]+[left-click mouse], then I lightened up the sword and some parts of the statue without the shortkey I mentioned before.

 I wanted to change the atmospheric color. For this, I go to 'ADJUSTMENT' and select the gradient symbol. In the gradient map settings I get to decide which colors I want for the gradient layer.

When I'm done, this(picture above) is the result.

I then made a duplicate layer of the 'Motherland copy'. As a result, 'Motherland copy 2' is generated. In the layer 'Motherland copy 2', I used the 'Dodge Tool' again to give it a more damatic feeling by darkening the whole picture more ([ALT]+[left-click mouse]) with a bit of lightening things up with creating effects.

After that, I select the 'Type tools', the shortcut key is [T]. Of course, the words that I wrote on the picture is "THE MOTHERLAND CALLS>>>..", "PREPARE", "FOR", and "BATTLE" with its font size set to 24pt. I then arrange the words using the 'Move Tool(V)'.

Finally, I click 'File>Save for Web & Devices...' to save the file into a jpeg file to finalize everything I've done.

 This is how the new Motherland Calls picture look like. Doesn't it just feel like a book or dvd cover?..Anyway, I'm done here. Bye!

Thursday, October 28, 2010

e-Wallpaper...my ideation


For my assignment 1, I'm deciding to do a festival called Tadau Kaamatan (Harvest Festival) which is from my homestate.

So basically, The word Kaamatan is derived from the root word tomot, a Kadazandusun term for harvest. Kaamatan festival is an annual event in the cultural life of the Kadazandusuns of Sabah since time immemorial. In its deepest sense, Kaamatan festival is a manifestation of Creator and Creation relationship, as well as Inter-Creations relationship. It embodies the principal acts of invocation of divinities, appeasing, purification and restoration, re-union of benevolent spirits, and thanksgiving to the Source of All. It is part of a complex wholesome Momolian religious system centered on the paddy rites of passage and the life cycle of Bambarayon – the in-dwelling spirit of paddy. It is celebrated usually around end of May, every year.

The festival is observed in 6 rituals stages:
The Kumogos Ceremony
Before a harvest begins, a Bobohizan/Bobolian (ritual specialist) will select and tie-up 7 stalks of the best rice from a plot of rice field. These stakes of rice will only be harvested after the particular plot of field has been completely harvested. The 7 stalks of rice will then be scattered all over the rice field. This gesture is to inform the other spirits who may be present among the rice field not to make any disturbance when the harvesting work is to commenced and each of them will be given something after the harvest.
The Kumotob Ceremony
From the area which has not yet been harvested to the Bobohizan/Bobolian will select 7 stalks of the best rice. The selected stalks are then tied up together and placed in a tadang (a type of basket for keeping rice). The rest of the rice in the field are then harvested and the rice are turned into seed for future planting season.
The Posisip Ceremony
The Bobohizan/Bobolian goes to a rice hut together with the 7 stalks of rice which is tied up and placed in the tadang. While reciting chants she takes out the bundle of rice stalks and insert them in a bamboo pole kept in the tangkob. The recital of the chants is to call the spirit of the rice to stay in the rice hut until the next planting season, i.e. when the rice spirits are called to the rice field again.
The Poiib Ceremony
In the rice hut the Bobohizan/Bobolian carefully pours the rice into the tangkob. This process is repeated for a number of times until all the rice has poured into the tangkob. The Bobohizan/Bobolian then recite chants appealing to the rice spirits to keep watch over the rice stored in the tangkob.
The Magavau Ceremony
This is the most important ceremony in the sequence of events of the harvest festival. This focuses in the restoration of Bambazon/Bambarayon as well as offering food to Bambazon/Bambarayon. In the olden days, the Magavau ritual is performed in the padi field on the night of the first full moon after the harvest. Nowadays, this ritual is carried out in the house of the owner of the field.
The Humabot Ceremony
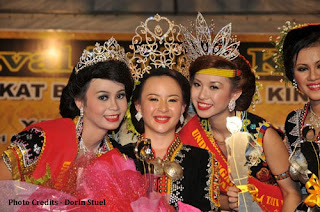
This is the final stage of the observation of the harvest festival and is in the form of merry-making and entertainment. This ceremony is now celebrated at village, district and state levels annually (30 - 31 May). A variety of entertainment and activities in the form of dances and traditional sports are held and the climax of the event is the selection of the Unduk Ngadau (Harvest Festival Queen). The Unduk Ngadau symbolizes Huminodun, the sacrificed daughter of Kinoingan.

The rituals described above are typical of the Kadazan-Dusun of the Penampang-Papar area. Other dusunic groups, the murutic groups of the interior and the paitanic groups in the east have different rice harvest rituals. For example, the Lotud Dusun have a series of eight ceremonies - Mansalud, Monuras, Tumakau, Matang, Mongoi Rumali, Mogimpuun, Sumondod and Monumbui. The essence of this ceremony however is the same, that is of thanksgiving for a plentiful harvest.
(Reference: http://en.wikipedia.org/wiki/Kaamatan)

These are are the images I am going to use for my festival assignment 1:
Mount Kinabalu

Padi field

Wakid basket

Sumazau Dance


Tempayan
Here's my sketch for the wallpaper(Below).

Tuesday, October 26, 2010

"free-photoshop-video-tutorials.com"

http://www.free-photoshop-video-tutorials.com/ is a website that I love love reffering to for my photoshop works because it has many video-tutorials on photoshop which is essential. Recomended, in deed.
 
 Do check out the site!

Here are some of the many videos from the site:
 
This video above is about "How To Fix Blurry Photos"
 
                                 This video above is about "Learn How To Remove Noise From A Photo"

That's all I would like about for now...Bye!

Sunday, October 24, 2010

Paranormal Activities At The Pyramids.. ( Working with Layers)

I was trying out my photoshop software as I decided to explore it. So, this is my first post on showcasing on what I did with the image i edited (above). Yes, I edited the picture of the pyramids.

This is what I did:


First, I downloded the picture from the web, then opened it in the photoshop software. The image itself is already labeled as "Background" by default in the LAYERS section in the photoshop. In the photoshop, I right-click the layer "Background" to convert it to Smart Object, and then right-click it again to rasterize the layer. Notice that the layer named "Background" is automatically changed to "Layer 0". I then zoom in the image using this shorcut: [ALT]+Mouse Scroller. There's also another way to zoom in: [ALT] + [+]


Next, I redused the image' color noise by clicking Filter>Noise>Reduse Noise. In the 'Reduse Noise', I set the Strength: 10; Preserve Details: 50%; Reduse Color Noise: 100% and Sharpen Details: 20%. Notice in the image above that I unticked the "Remove JPEG Artifact". I then clicked 'OK'. As a result, the color noise in the image is reduced.

 After that, I dragged the "Layer 0" in the LAYERS section to 'create new layer'. This is to duplicate the layer. I find this useful as it is more like a backup wherenever mistakes that I accidently made on the image. When it is duplicated, the new layer is labeled as "Layer 0 copy" automatically.


I then used the "Soft healing brush tool" to remove the biker and its bike and make it as if the biker was never there at all. See the difference between the two picture above?

I duplicated the "Layer 0 copy" to get "Layer 0 copy 2". For the new layer, I set it to "Overlay". I didn't make any changes on its Opacity and Fill. When I changed the setting of the layer, the color is simply enchanced.
Next, I created a new layer and decided to name this layer "Cloud" This is because I wanted to create 'cloud effect' around the pyramids.
  So here's what I did: Filter>Render>Clouds. After that,  the whole layer is covered with clouds and its obvious that I had to do something about it.

 I set the 'Cloud' layer settings to 'Soft Light' and set the 'Opacity' to 80%. As result, the picture above is what I got.

Finally, after thinking what more could I edit, I changed the "Layer 0 copy 2" setting from 'Overlay' to 'Hard Light'. I used the 'Burn tool' to darken sky and put some shadow effect with the 'Burn tool' by using these key shortcuts: [ALT]+[Mouse Left-click]. I then use the 'Dodge tool' on the sky to make 'paranormal lights' and also some on the land. I also dodge the pyramid on the sides to make it as if something is shining behind. That's all.

Here's the final product after I save it for web & devices.

Monday, October 18, 2010

Hello Blogging World....An Introduction of Myself....

Name: Jason Wong Zhin-Ming
Student ID: 1102701493

 Hello, my name is Jason. This is my very first time ever in blogging and I'm a total noob in it as well as doing photoshop and stuffs...I come from Kota Kinabalu, a seaside capital of Sabah, situated in East Malaysia, northern part of the world's third largest island, Borneo island. I am of mixed blood, chinese and kadazan, which makes me a sinokadazan. I don't speak chinese although a I'm half chinese, simply because I'm used to speaking English within my family and I'm more to my kadazan and bruneian family side. I love love love so much watching reality shows as well as concerts on TV. My favourite TV channel would be MTV, Starworld and Star Movies. Owh, by the way, I'm currently having and using Adobe Photoshop CS5.